Baltimore Heritage Quilt Guild (baltimorequilters.com) is teaming up with the Baltimore County Public Library to teach the basics of piecing by making potholders at the Hereford branch this Saturday. I am hoping to create some new quilting addicts at this event. It starts with a potholder and ends with a roomful of fabric, a parade of quilts, and lots of quilt-loving friends.

Trick of the Light Workshop Projects
Yep. I haven't posted in more than two years. Apparently, I cannot be a full-time software engineer and also find time to do a quilting blog. That doesn't mean I haven't been quilting though. One of these days, I'm going to add those piles of quilts to my Etsy shop.
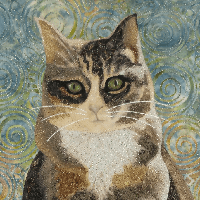
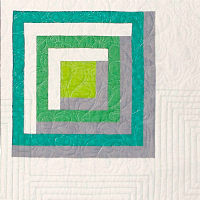
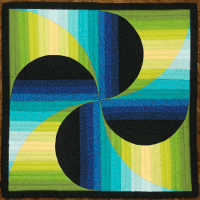
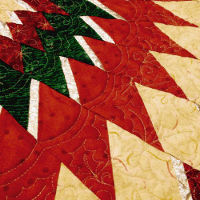
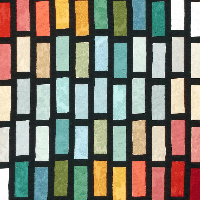
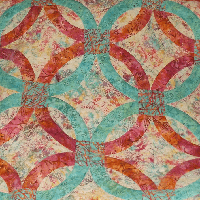
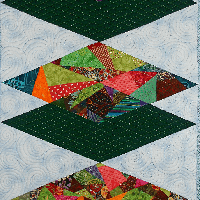
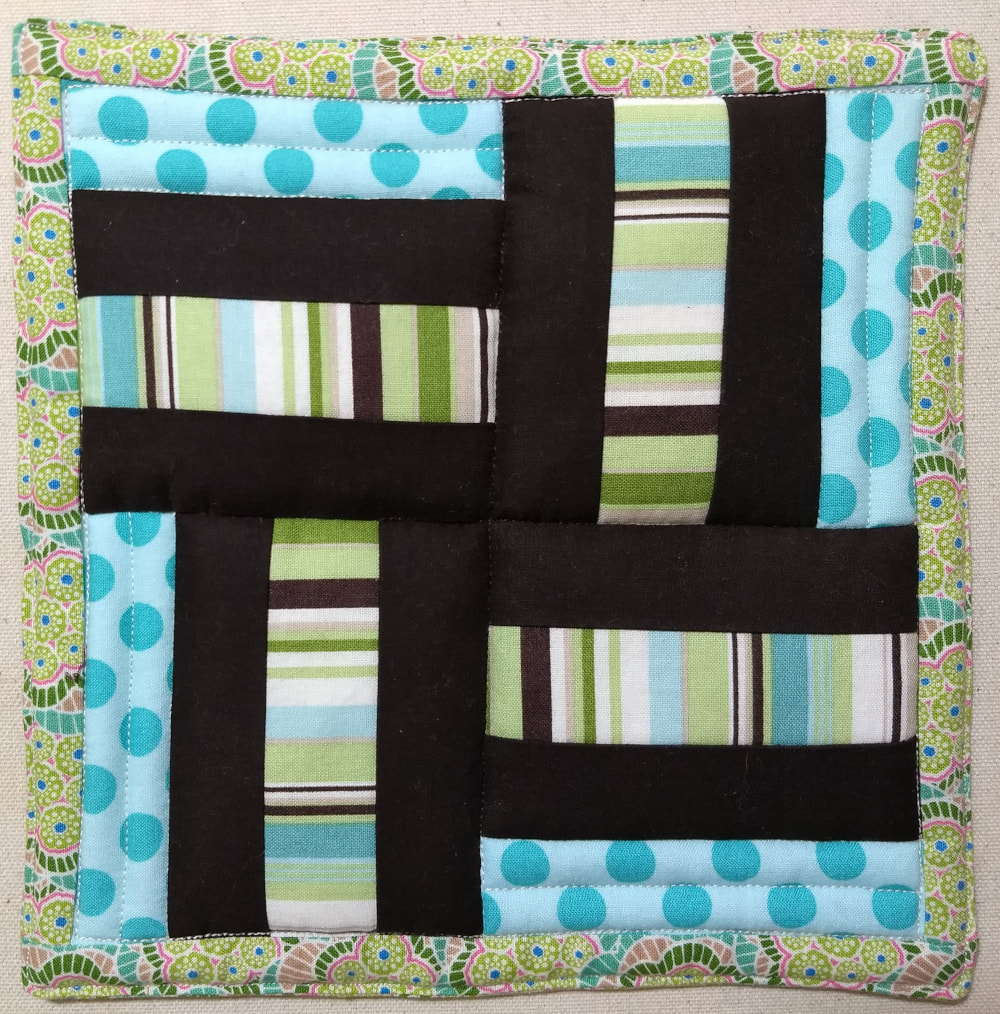
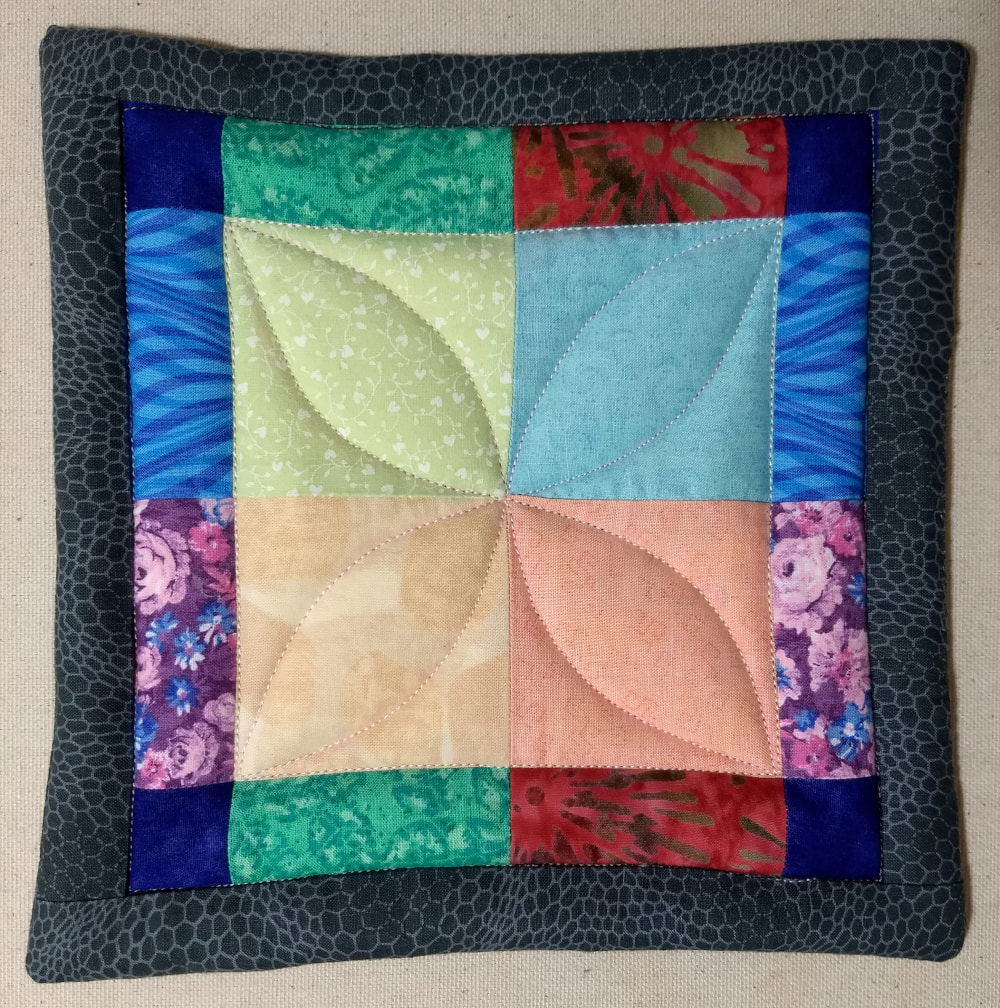
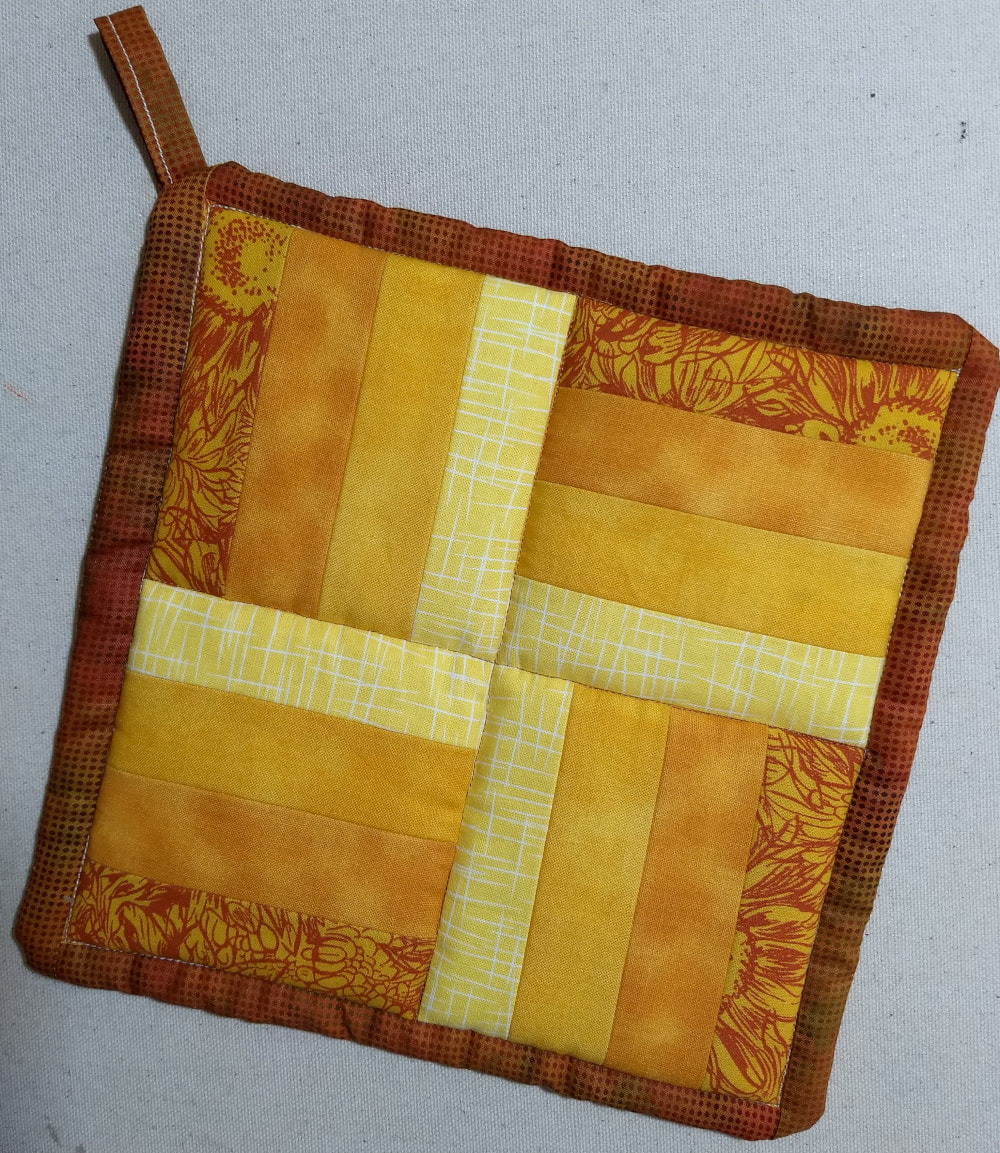
In the meantime, I am getting ready for a workshop called Trick of the Light at the Baltimore Heritage Quilters Guild (BHQG). We'll be playing with illusions of luminosity and transparency. I have so many examples and project ideas - now I need to sift and organize them. The workshop is more about concepts and techniques than specific projects, but I came up with the three projects in the pictures above so that participants have something to work on. They can choose one of those or jump off into their own designs. The supply list was a challenge since part of what we'll be talking about is how to select fabrics to get the look that you want.
In the meantime, I am getting ready for a workshop called Trick of the Light at the Baltimore Heritage Quilters Guild (BHQG). We'll be playing with illusions of luminosity and transparency. I have so many examples and project ideas - now I need to sift and organize them. The workshop is more about concepts and techniques than specific projects, but I came up with the three projects in the pictures above so that participants have something to work on. They can choose one of those or jump off into their own designs. The supply list was a challenge since part of what we'll be talking about is how to select fabrics to get the look that you want.
I haven't posted in forever, but that doesn't mean I haven't been quilting. Here's the lap quilt / sofa quilt I just added to my Etsy shop:
It's a simple log cabin design, but I like the way the white and gray placement gives the squares some depth. If you click on the photo, it will take you to my Etsy shop where there are more photos for a closer look.
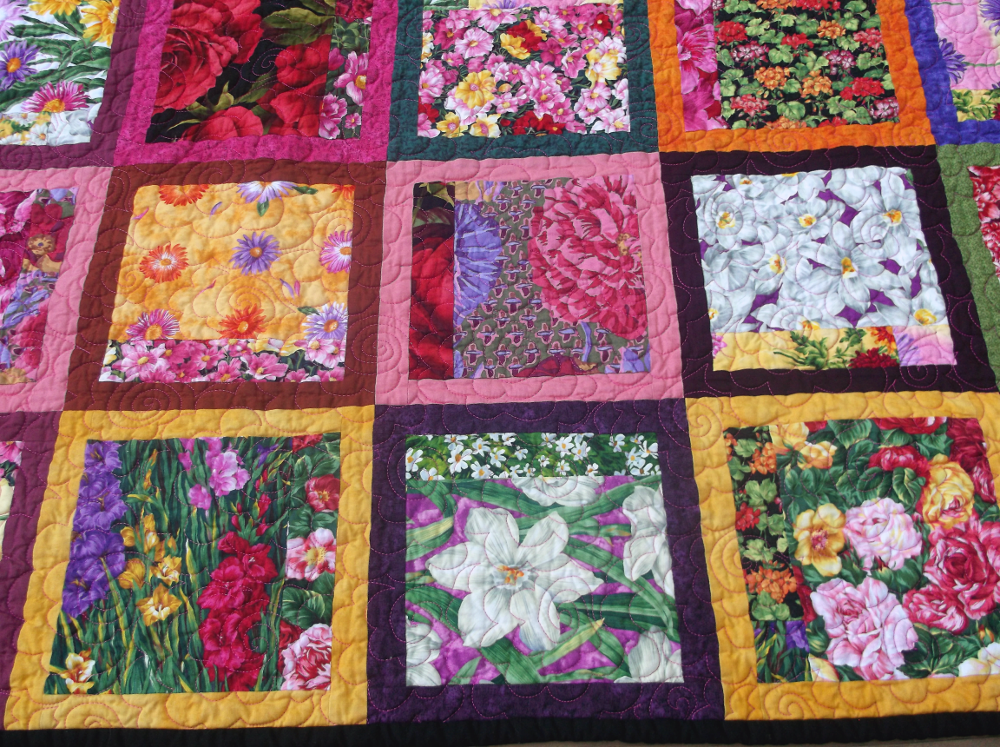
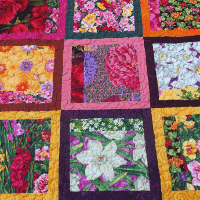
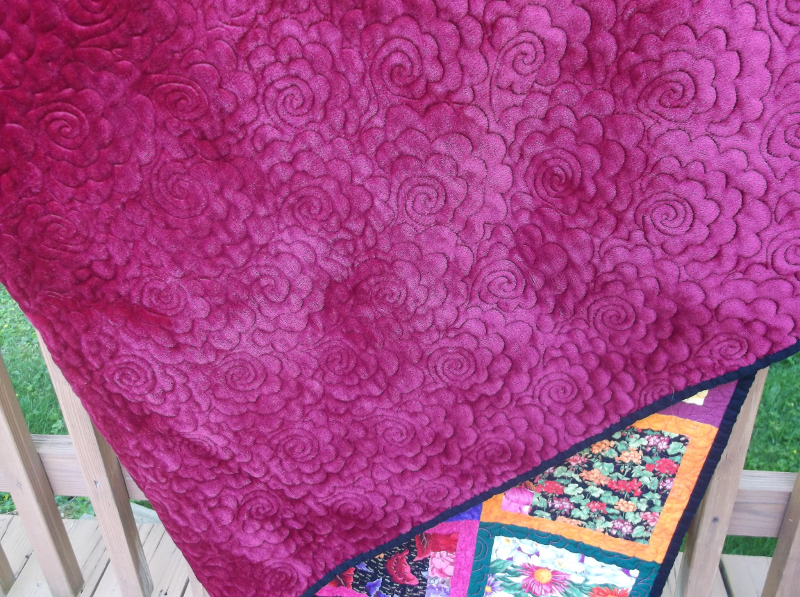
I started this quilt at the guild's fall Charity Quilt-a-thon and quilted it at the spring Quilt-a-thon. It began as a donation of 16" blocks of bright large-scale floral prints. They were overwhelming. I cut them down to 8" blocks and framed each with a solid to give a visual separation to the different prints. I put a cuddly backing on it and quilted it with an all-over pattern called Flower Power that I got from Lori Kennedy's website. Here's a picture showing the back:
I turned it in at the guild meeting yesterday so that they can pass it on to the House of Ruth. I hope it brings joy to someone in need of a lift.
To read about more of my quilts, click on the slideshow in the header.
To visit my Etsy shop, click here.
To read about more of my quilts, click on the slideshow in the header.
To visit my Etsy shop, click here.
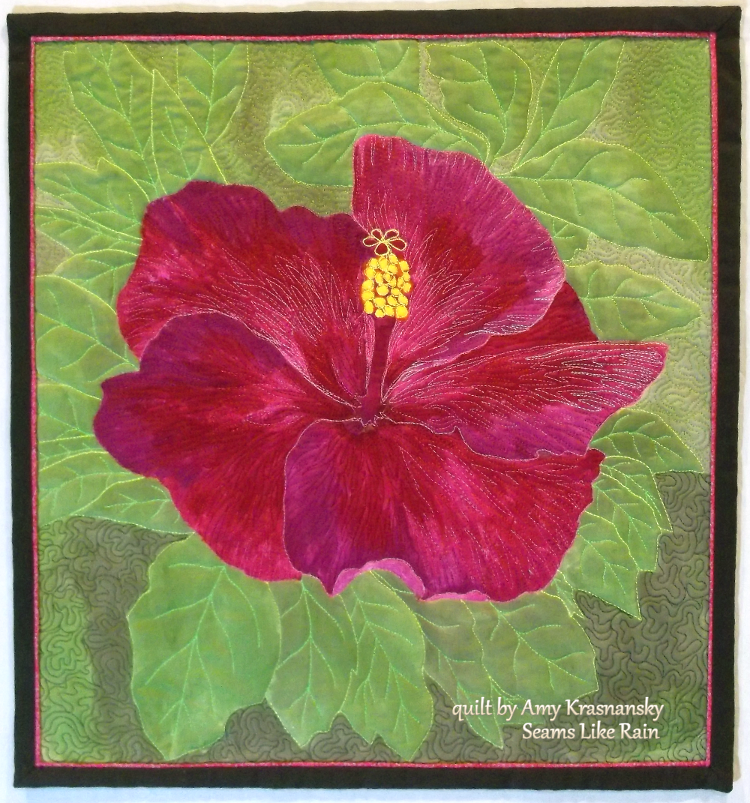
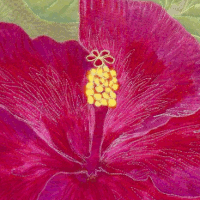
I finally finished this little art quilt made from a picture of a hibiscus flower. I started it about a year ago in a dye painting class by Hollis Chatelain. I painted the whole piece onto white cotton fabric in the class. The process was fun, but frustrating because I couldn't tell how the painting would look once it was washed. I was disappointed with this piece because when I washed the dye out, the flower did not have enough internal contrast, so it looked a lot like a big pink blob! However, I had a feeling I could rescue it with the quilting, and this week I decided it was time to give it a try. I used free motion quilting to emphasize the structure of the flower and the leaves. The stitching really helped give the picture definition. Then I added pink piping and chocolate brown binding to finish it.
Click here if you want to see it in my Etsy shop, along with more pictures.
Check out the other piece (Flowering Vine) that I made in that dye painting class here.
Clicking on a quilt in the slideshow in my header will take you to a blog about that quilt.
Click here if you want to see it in my Etsy shop, along with more pictures.
Check out the other piece (Flowering Vine) that I made in that dye painting class here.
Clicking on a quilt in the slideshow in my header will take you to a blog about that quilt.
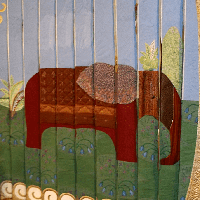
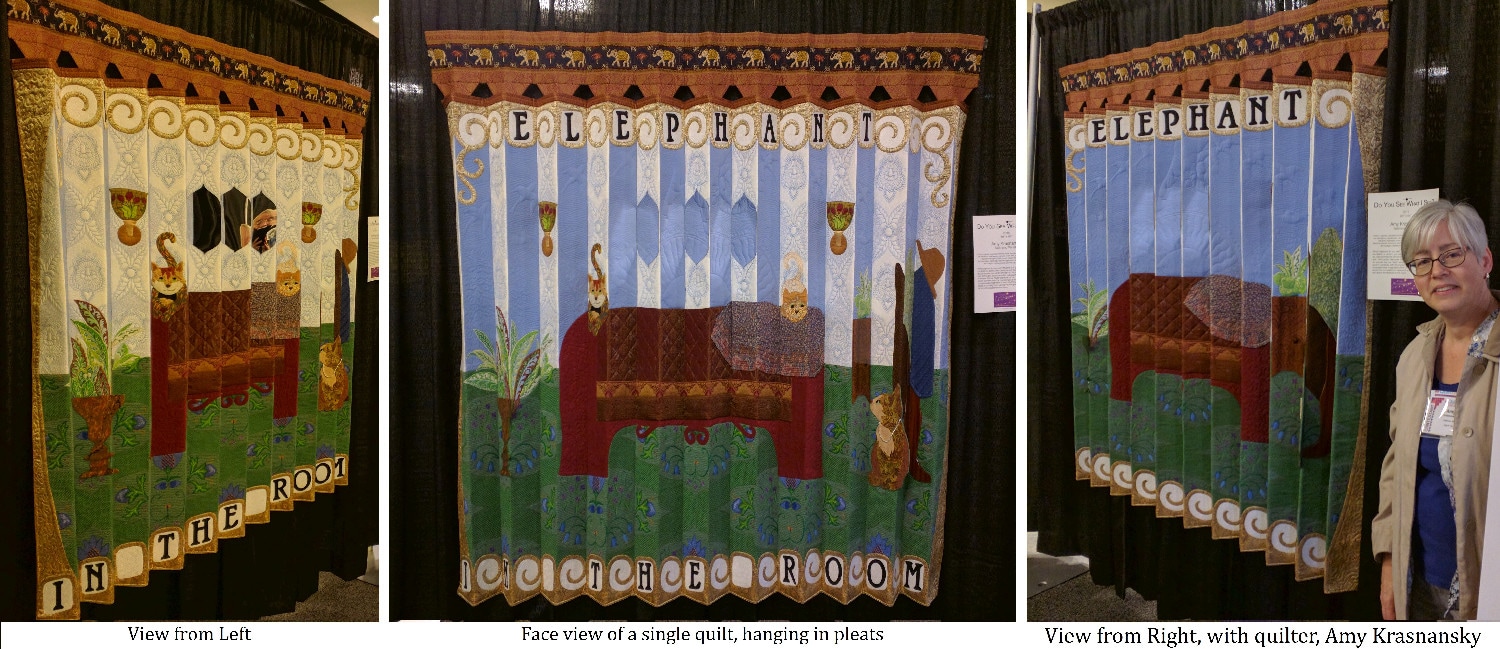
My parents and I did a whirlwind tour of the Lancaster quilt show on Saturday. Always a humbling, but amazing experience. Here are pictures my Dad took of me with my 3D elephant quilt, Do You See What I See? It was at Lancaster with the National Quilt Museum's Gala of the Unexpected exhibit (their 25th anniversary contest). After we took the pictures, I noticed a sign prohibiting pictures of the exhibit. Oops!
I have quilts in two quilt shows coming up. If you are in the Maryland/Pennsylvania area, stop by and take a look.
The first show is the Baltimore Heritage Quilters' Guild Expo on March 18-19th. I have seven quilts in the BHQG show, including the NY Grand Central Terminal quilt and debuting the Revelation dragon quilt (which I will absolutely have finished quilting by at least the day before it starts!)
March 18-19, Sat-Sun, 10 am - 5 pm
The Park School Athletic Center
2425 Old Court Rd
Baltimore, MD 21204
Tickets are $8 at the door, $7 if you order them in advance from the website.
The second show is AQS Lancaster. I will have two quilts there: Fractal Blooms and Do You See What I See? (3D elephant quilt touring with the National Quilt Museum's 25th anniversary quilts - you will probably have to go upstairs to see this one). I will be going myself on Saturday, April 1st.
March 29-April 1, Wed–Fri, 9 am - 6 pm , Sat. 9 am – 4 pm
Lancaster Convention Center
25 S Queen St
Lancaster, PA 17603
Tickets are $14 at the door for a single day, $12.60 if you buy them in advance from the website.
Here's a picture of the Revelation dragon quilt, not quilted yet, titled The Beginning and the End:
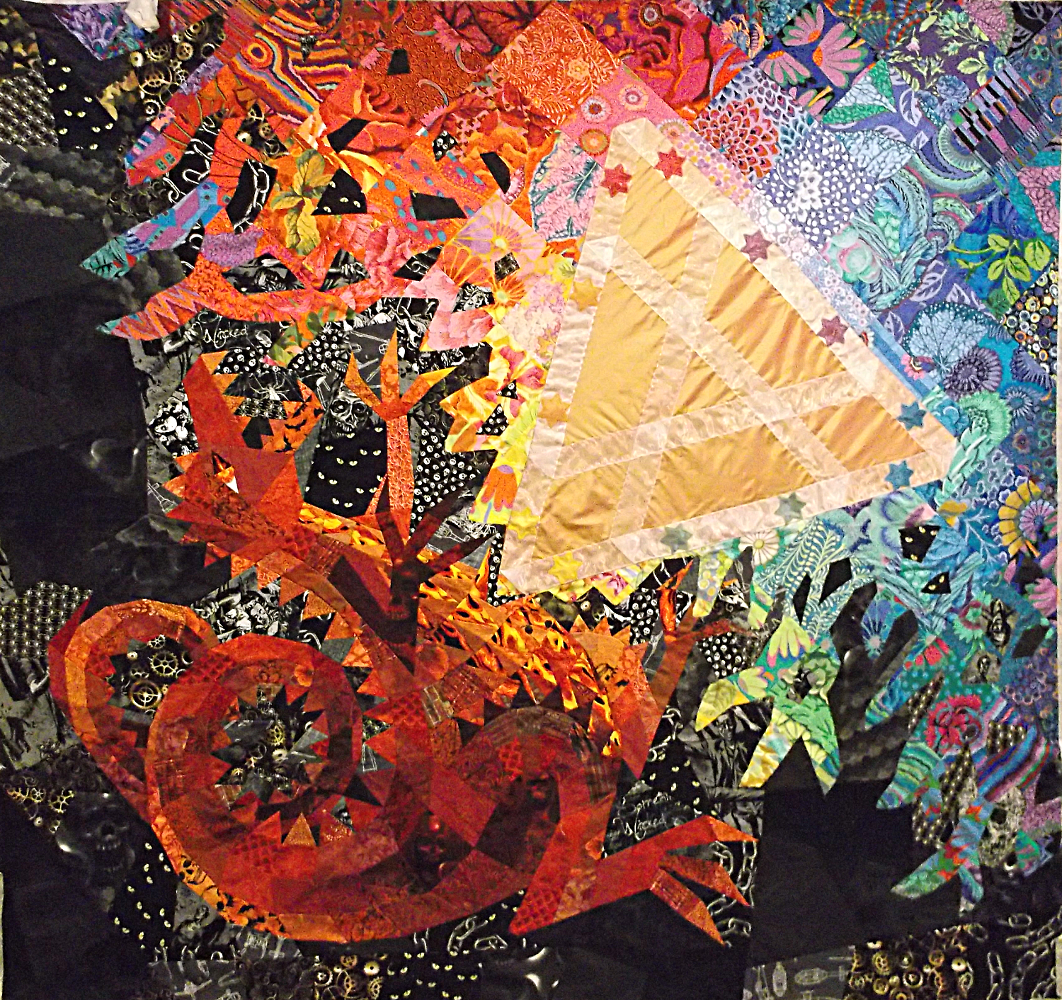
The artist's statement:
This quilt was created after a study of the book of Revelation. It represents the final conflict between good and evil. The triangle represents the trinity of God. Although you cannot really tell, the triangle is constructed from 3 mobius strips (representing infinity) formed into interlocking triangles and stitched down. The twelve stars on the triangle refer to both the 12 tribes of Israel (Judaism) and the 12 disciples (Christianity). The dragon represents the forces of evil as they are being overthrown.
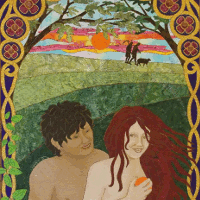
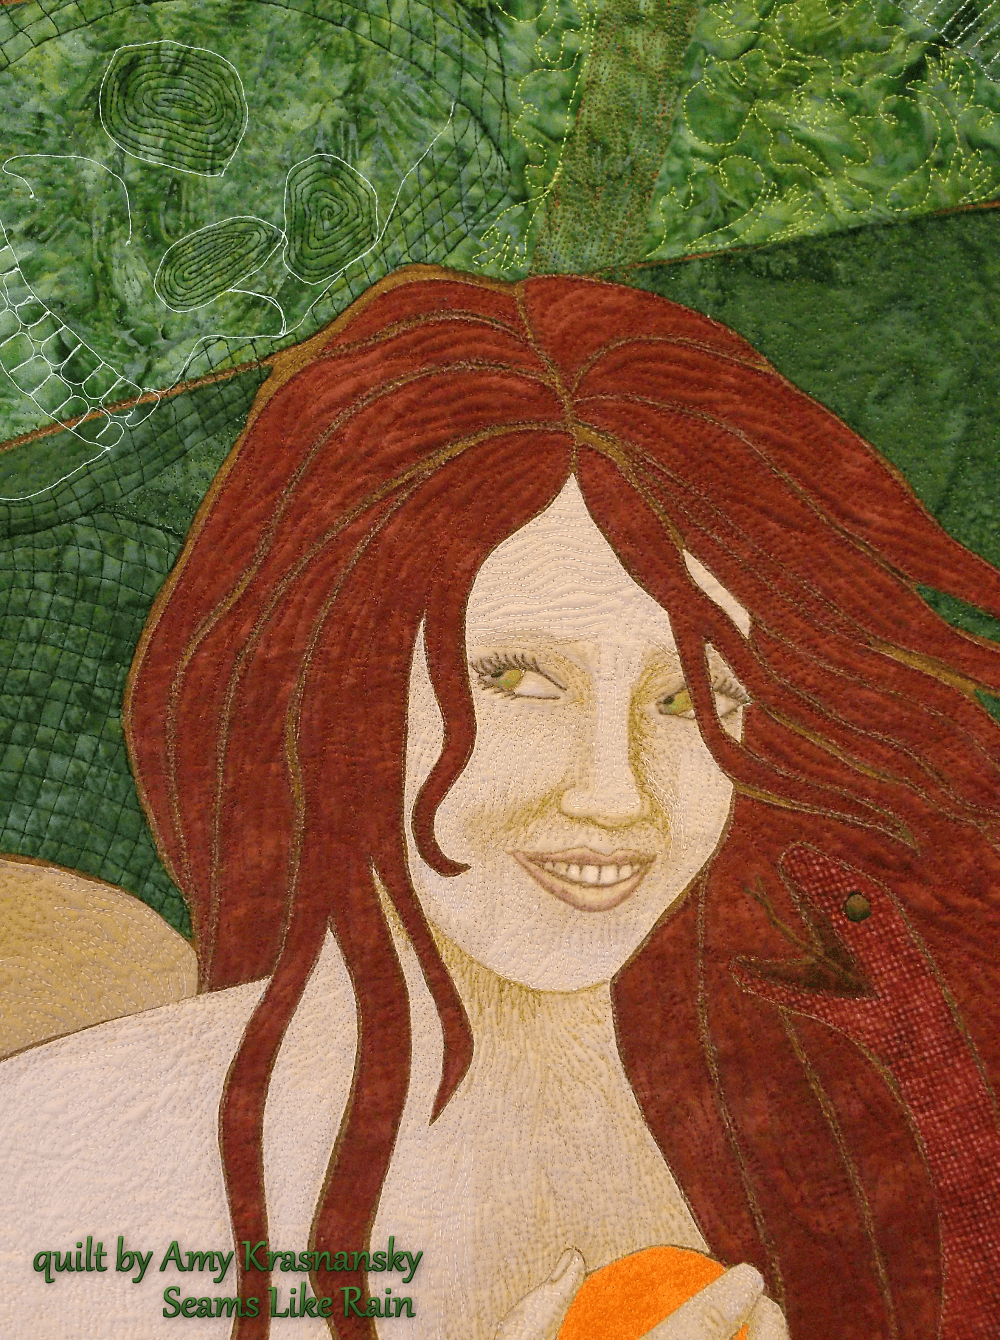
I have been working for the last couple of months on an art quilt to be submitted to the SAQA Textile Posters exhibition. Finally finished it a few hours before the deadline. My goal was to make it look really attractive from a distance, but put in some disconcerting elements that would only be seen up close (in keeping with the title, "False Advertising". Here's the picture of the full quilt:
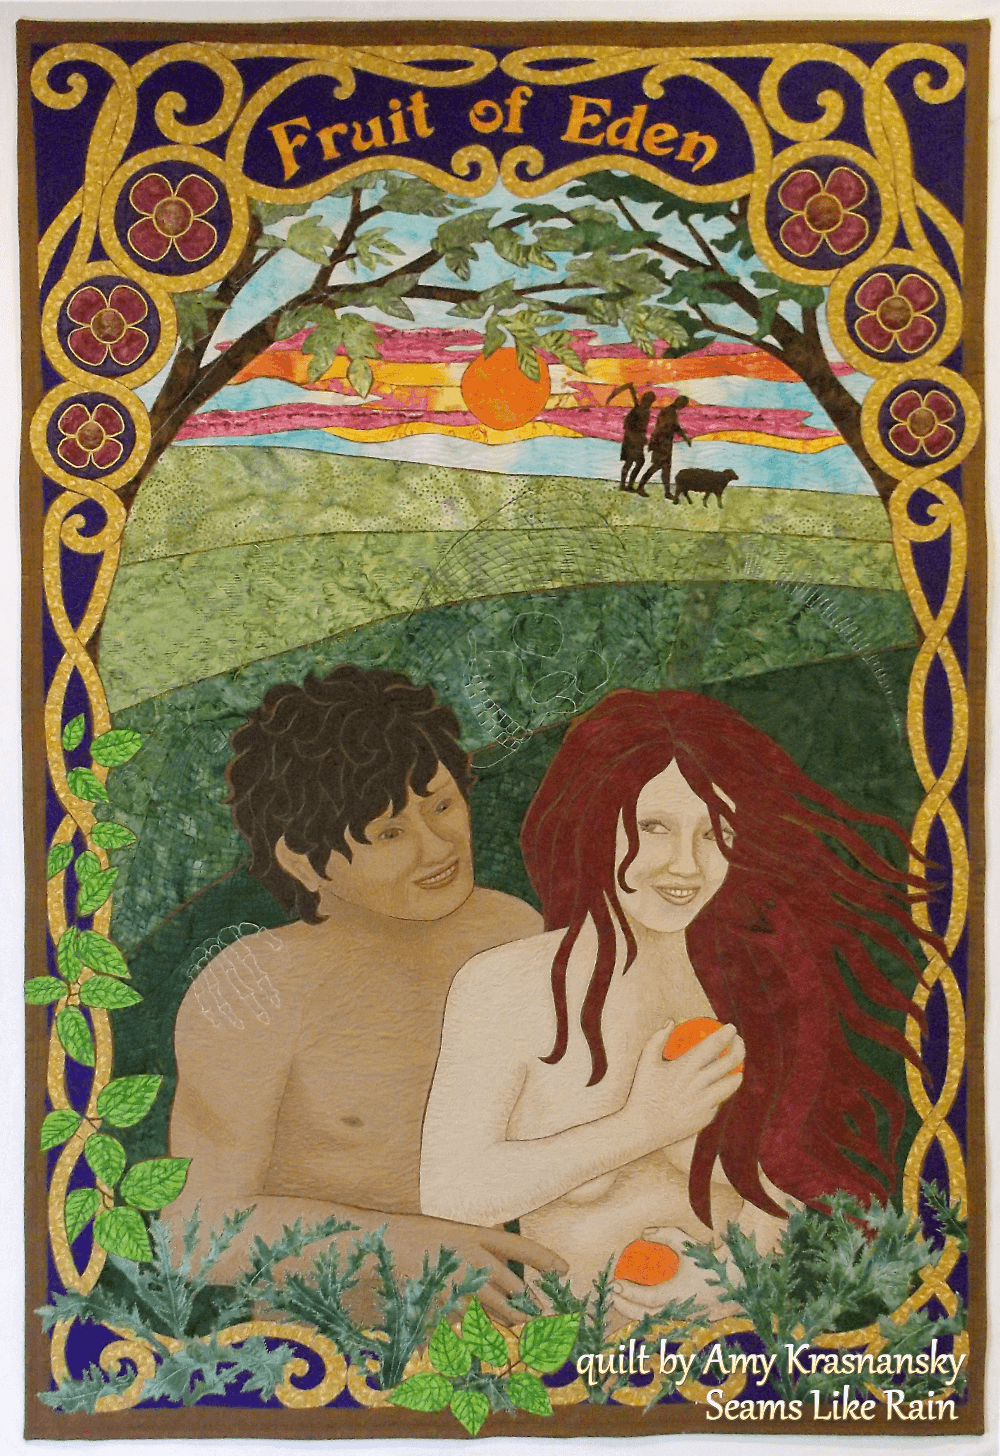
If you look carefully, you can see that Death is quilted into the background behind the main figures. The plants are intended to be thistles and poison ivy. There are some other subtle things going on, but I can't give away all my secrets. Here's the close up pic:
It was made with lots of pieces of fabric raw-edge appliqued onto a brown background. I used colored pencils and fabric paint on Adam and Eve to add detail and dimension. Then I quilted everything heavily.
Here's the artist's statement, always challenging to write. You may not agree with it, but it includes what I was thinking about as I made the quilt. One of the good things about making art quilts is that they take long enough to make (at least mine do) that they become the source of a lot of reflection.
Here's the artist's statement, always challenging to write. You may not agree with it, but it includes what I was thinking about as I made the quilt. One of the good things about making art quilts is that they take long enough to make (at least mine do) that they become the source of a lot of reflection.
Fashioned after the art nouveau posters of the early 1900s, False Advertising is meant to seduce the viewer from afar with opulent curves, and sparkle, and smiles. However, a closer look reveals that all's not well in paradise. Adam and Eve stand at the moment of decision while the consequences of their misplaced faith take effect around them.
Adam and Eve might have been the first to succumb to false advertising, but they are certainly not the last. Now more than ever, we are surrounded by continuous promises of beauty, health, entertainment, and wealth. Constant distractions keep us from the contemplation that might enable us to value kindness and mercy, and to pursue substance over appearance, character over charisma, and sound judgment over sound bites. With the reminder that Death looms ever present at our shoulders, we would do well to consider whether the fear of God could still be the beginning of wisdom.
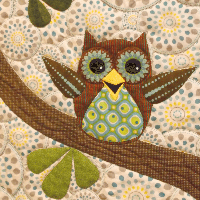
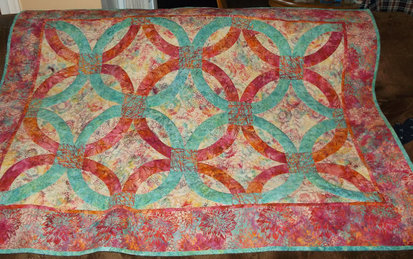
i just finished a lap quilt for my sister for Christmas (Our family get together was today, so done just in the nick of time. Here's a picture:
My sewing machine's foot pedal broke part way through, so I had to use the Start/Stop button for the rest of the quilt. It was challenging on some of the applique pieces, a lot of starting and stopping on the curves. I decided to do straight lines for the quilting so that I wouldn't have to start and stop as much. I think it turned out cute - hard to miss with a baby animal involved.
Here's the pattern, reversed so that it can be traced onto freezer paper.
|
| 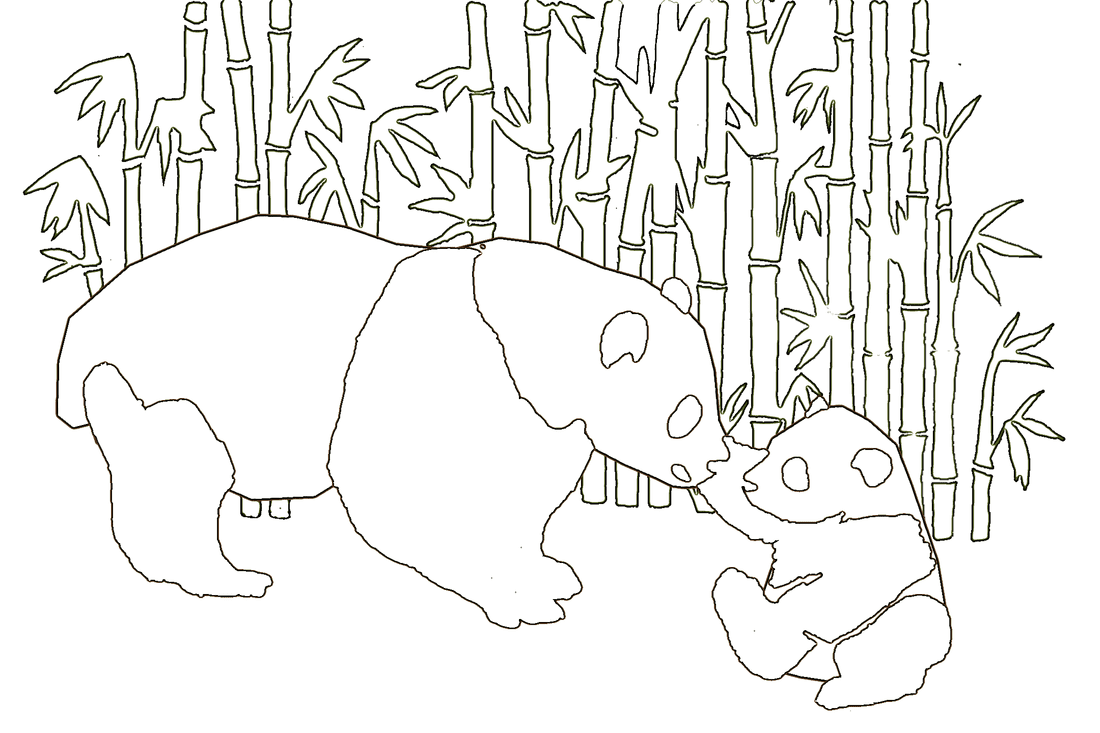 | ||||
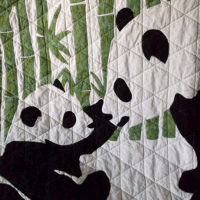
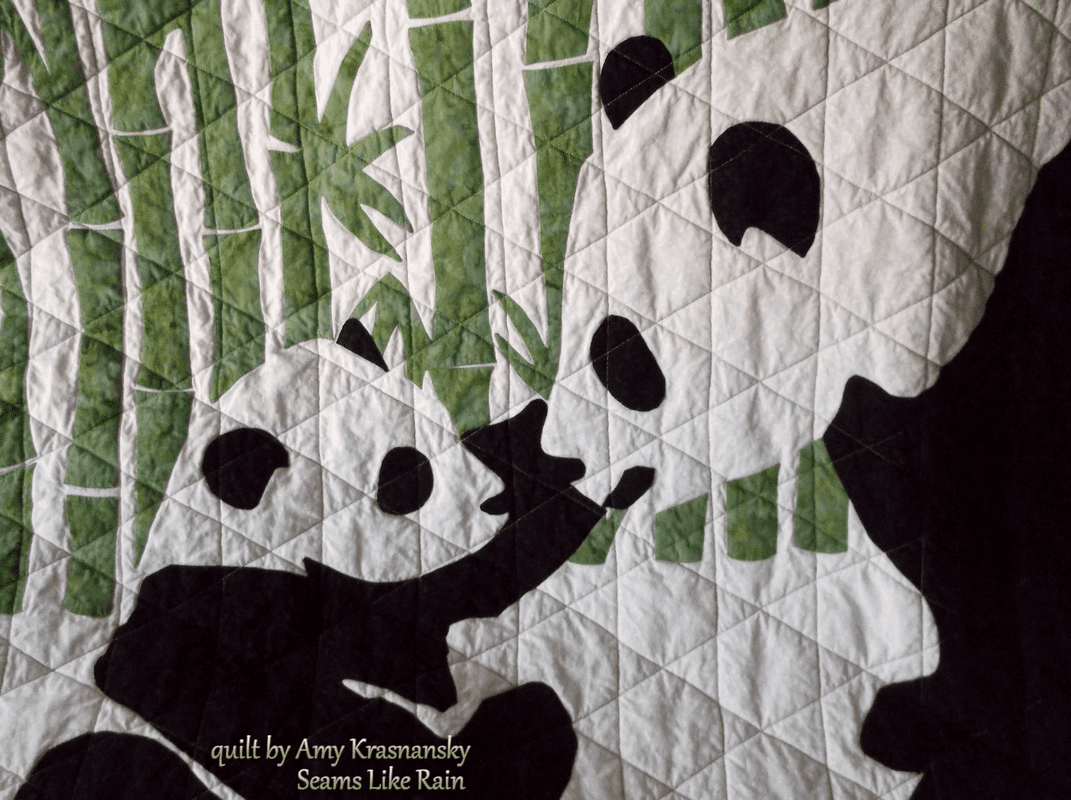
Tutorial for my process (sorry, I didn't take pictures, but feel free to ask questions):
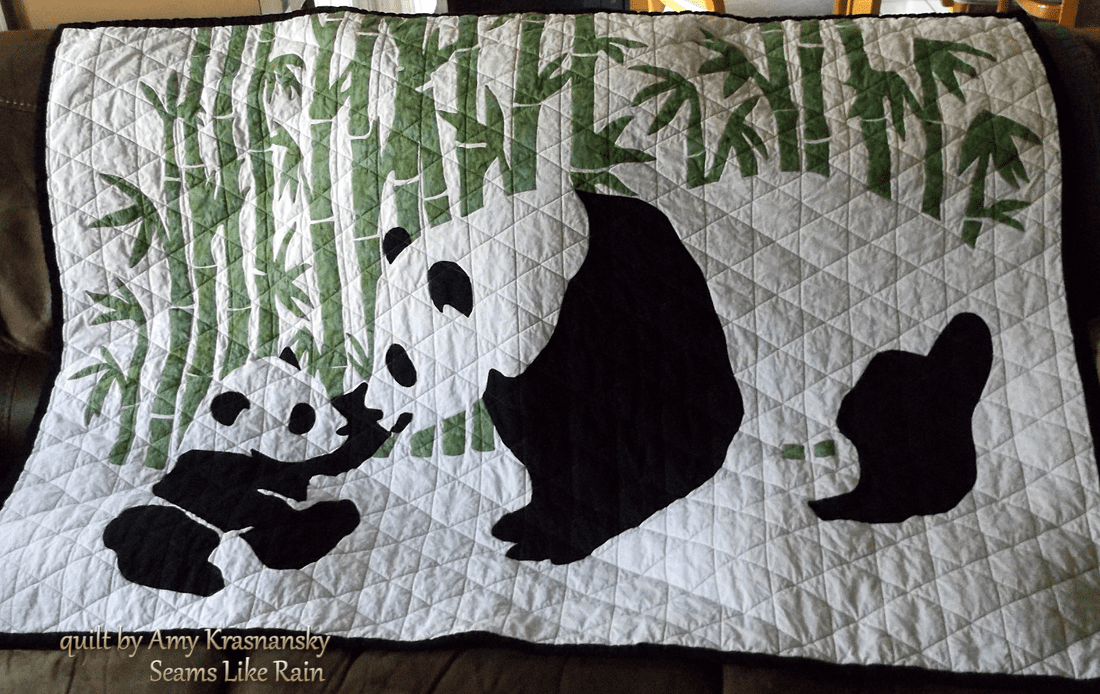
1. Print the pattern out full size on multiple sheets of paper (the quilt I made was 40" x 60") and tape all the pieces together. See the end of the page for instructions on downloading and printing.
2. Trace all of the bamboo pieces and the black parts of the bears onto freezer paper. Since I used a white background fabric, I did not make pieces for the white parts of the bears, but instead let them flow into the background. I suggest numbering all the pieces on the pattern and the corresponding freezer paper pieces so that it will be easier to place the pieces later.
3. Cut out all the freezer paper pieces.
4. Iron freezer paper pieces onto the back of fabric leaving space between them for approximately quarter inch seam allowance around each piece.
5. Cut out the fabric pieces with the seam allowance around them. Clip the concave curves and corners.
6. Iron the allowance down over the freezer paper using a mini iron and starch to make it stay down.
7. Flip the full size pattern over and trace the lines with a black marker. Now you can use it as a placement guide for your applique pieces. Lay the white background fabric on top.
8. Position all of the applique pieces on the background fabric. One at a time, peel the freezer paper off and glue the piece down using temporary fabric glue.
9. Stitch around all the pieces using a narrow zigzag stitch and clear monofilament thread.
Instructions for printing the .pdf file:
Instructions for printing the .png file with Paint (comes with Windows):
1. Print the pattern out full size on multiple sheets of paper (the quilt I made was 40" x 60") and tape all the pieces together. See the end of the page for instructions on downloading and printing.
2. Trace all of the bamboo pieces and the black parts of the bears onto freezer paper. Since I used a white background fabric, I did not make pieces for the white parts of the bears, but instead let them flow into the background. I suggest numbering all the pieces on the pattern and the corresponding freezer paper pieces so that it will be easier to place the pieces later.
3. Cut out all the freezer paper pieces.
4. Iron freezer paper pieces onto the back of fabric leaving space between them for approximately quarter inch seam allowance around each piece.
5. Cut out the fabric pieces with the seam allowance around them. Clip the concave curves and corners.
6. Iron the allowance down over the freezer paper using a mini iron and starch to make it stay down.
7. Flip the full size pattern over and trace the lines with a black marker. Now you can use it as a placement guide for your applique pieces. Lay the white background fabric on top.
8. Position all of the applique pieces on the background fabric. One at a time, peel the freezer paper off and glue the piece down using temporary fabric glue.
9. Stitch around all the pieces using a narrow zigzag stitch and clear monofilament thread.
Instructions for printing the .pdf file:
- If you don't have Adobe Acrobat Reader, you will have to get the free download for that.
- Click on the Download File link under pandas.pdf above.
- When the picture appears in your browser, click on the Download icon on the line above the picture and select a place to save the file. Click the Save button.
- Find the pandas.pdf file on your computer (where you saved it), and double click on it to open it in Adobe Reader.
- In Adobe Reader, Select File, then Print.
- On the Print window, under Page Sizing & Handling, select Poster.
- Make sure the Tile Scale is 100% (assuming you want it to be 40" x 60". If you want a different size, scale it to whatever size you want) DON'T PRESS ENTER UNTIL YOU ARE READY TO PRINT
- Select Landscape.
- Click the Print button.
Instructions for printing the .png file with Paint (comes with Windows):
- Click on Download File under pandas.png.
- When the picture comes up in your browser, right click on it and select Save Image As and then save it somewhere on your computer.
- Find the pandas.png file on your computer (where you saved it). Right click on it and select Open With Paint.
- In Paint, select File, then hover on Print, then Page Setup.
- On the Page Setup, select Landscape.
- Set all the margins to 0.12.
- Select Adjust to 100% Size (this is where you can resize it if you don't want it to be 40" x 60").
- Click OK.
- Select File, then hover on Print, then Print Preview.
- If it looks right, click on the Print button.
Joining the Quiltsy team on Etsy and working on my listings has paid off. I have sold a quilt! Say goodbye to this one, because it is heading to Oregon soon:
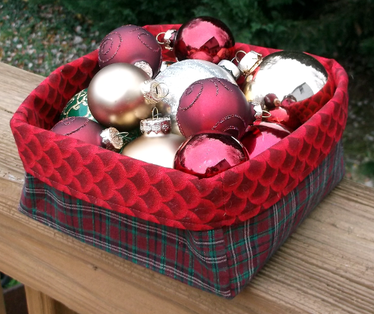
I have added several fabric boxes to my store (trying to get to 50 listings - at 21 right now). Here's my favorite fabric box picture. Filling it with shiny objects sure did a lot for its eye appeal:
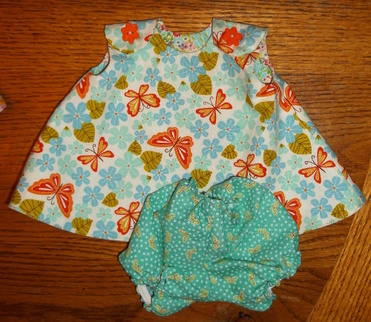
And speaking of eye appeal, I have been indulging in some instant gratification by making doll clothes for my niece who is getting a Baby Stella doll for Christmas. It has been a little challenging since I don't actually have the doll to try things on, although my sister sent me the clothes that came with the doll.
I got the pattern for the butterfly dress from Jeanne Rondeau's blog. The bloomers were from Pickled Okra.
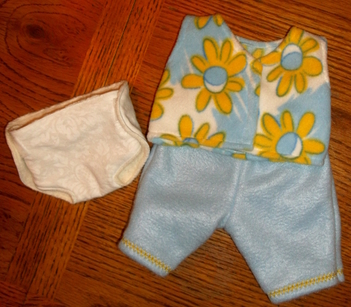
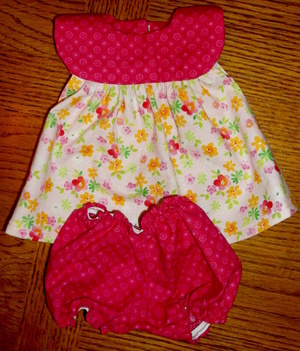
Then I did some pattern development of my own to make PJs, a diaper, and the pink dress below. Sure hope it all fits!
I got the pattern for the butterfly dress from Jeanne Rondeau's blog. The bloomers were from Pickled Okra.
Then I did some pattern development of my own to make PJs, a diaper, and the pink dress below. Sure hope it all fits!
 |  |
 RSS Feed
